Category: Uncategorized

  • Closure or Frontal? Choosing the Lace Piece for a Custom Wig Order

    Closure or Frontal? Choosing the Lace Piece for a Custom Wig Order

    Once hair type, length, and density are settled, the next decision on a custom wig order is the lace piece at the front: a closure or a frontal, and in which size. That single choice drives how the finished unit parts, how natural the hairline reads, how many bundles you need to buy alongside it, and a meaningful slice of the unit cost. Getting it right per use case is the difference between a wig that installs cleanly and one that fights the wearer every morning.

    What the numbers on a lace piece actually mean

    Every closure and frontal is named by its lace dimensions in inches. A 4×4 closure is a four-by-four inch square of lace. A 13×4 frontal is thirteen inches across, spanning roughly ear to ear, by four inches deep from the hairline back. Multiply those out and the coverage gap is stark: a 4×4 closure is about 16 square inches of lace, a 6×6 closure about 36, a 13×4 frontal about 52, and a 13×6 frontal about 78. More lace means more scalp-like area where hair can be parted and more room to hide the transition to the wefts behind it.

    Nominal area is not usable area. The panel shrinks in practice once the lace is cut to the hairline, bleached, plucked, and glued down, so treat these figures as relative sizes rather than a promise of parting space. What they reliably tell you is the pecking order, from the compact closure that fixes one parting zone to the ear-to-ear frontal that rebuilds the whole front hairline.
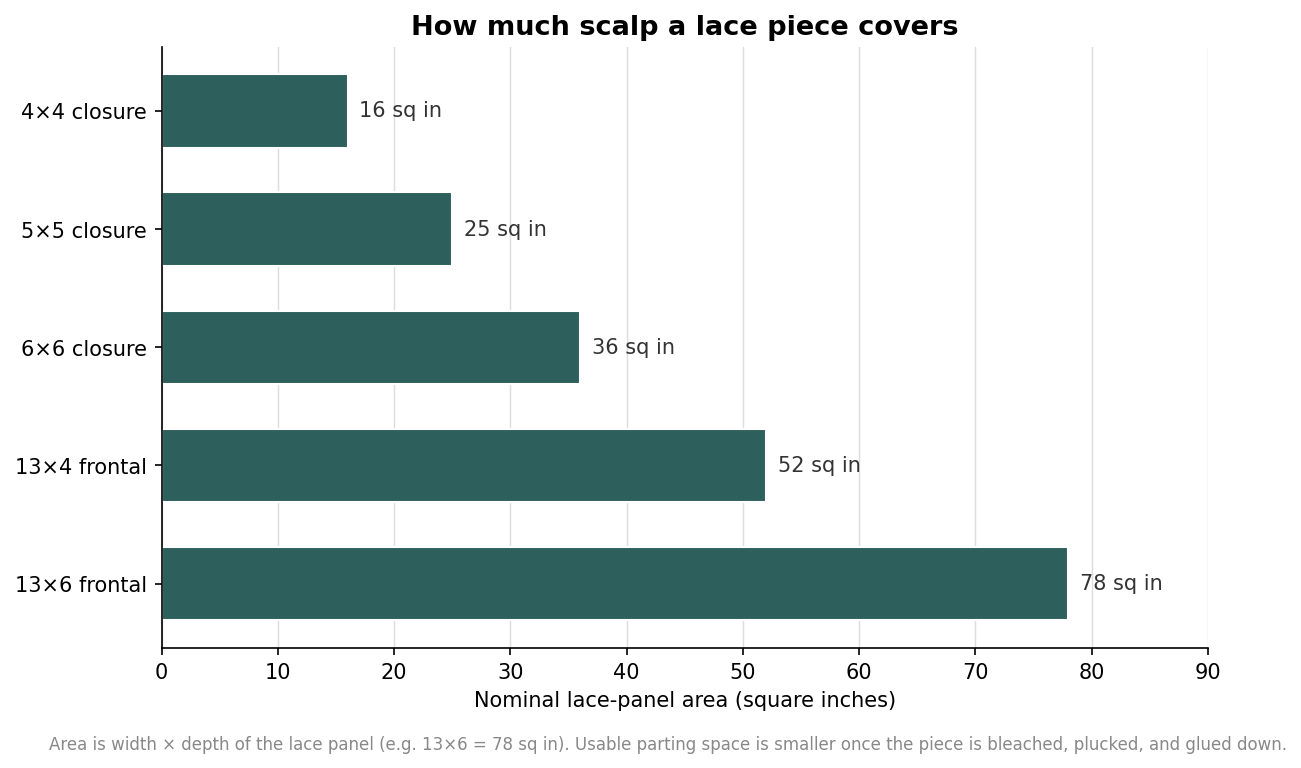
    Horizontal bar chart of lace piece coverage area in square inches from 4x4 closure (16) to 13x6 frontal (78)
    Nominal lace-panel area climbs from a compact 4×4 closure to an ear-to-ear 13×6 frontal.

    Closures: least lace, lowest cost, fixed parting

    A closure sits at the top or crown and closes off the section of the wig where the bundles would otherwise show a visible track. The common sizes are 4×4, 5×5, and 6×6. Because a closure only covers a central patch, it commits the wearer to a parting within that patch. A 4×4 handles a simple middle or modest side part; step up to 5×5 or 6×6 when the client wants a deeper side part or more freedom to move the part around without exposing wefts at the edge.

    The tradeoff is cost and versatility against coverage. Closures use the least lace, so they are the most economical front piece and the fastest to install, which makes them the sensible default for everyday units, budget-conscious bulk runs, and wearers who part their hair the same way every day. What a closure cannot do is give an ear-to-ear natural hairline or let the wearer pull the hair straight back off the face, because there is no lace out at the temples to sell that look.

    Frontals: an ear-to-ear hairline and real parting freedom

    A frontal runs the full front of the head from ear to ear, which is why it recreates an entire hairline rather than a single parting zone. The decision inside the frontal category is 13×4 versus 13×6. Both are thirteen inches wide; the second number is how far back the lace extends. A 13×4 gives about four inches of depth and comfortably handles center and basic side parts up to roughly two inches from center. A 13×6 adds two more inches of depth, about 50 percent more parting space, which opens up deep side parts out to around four inches from center, zigzag parts, and pulled-back styles.

    That freedom carries a price. Industry pricing for a 13×6 frontal typically runs on the order of 75 to 100 dollars above a comparable 13×4, reflecting the extra hand-tied lace. Choose 13×4 for a natural front at the best frontal price when the wearer parts within a couple of inches of center. Reach for 13×6 when the order is for versatile styling, deep side parts, or clients who want to change their look without changing units. Figures here are indicative market ranges and will move with hair grade and vendor.

    360 lace and when the whole perimeter matters

    A 360 frontal wraps lace around the entire perimeter of the head rather than just the front. It exists for one specific promise: the wearer can pull the hair into a high ponytail or an updo and still show a lace-backed, scalp-like edge all the way around. If a client’s core requirement is off-the-face styling and updos, the 360 is the piece built for it, and neither a closure nor a standard frontal will fake that convincingly. For any order where the hair lives down and forward, a 360 is more lace, more cost, and more install time than the look requires.

    Matching the piece to the order and the bundle math

    The lace piece also sets how much hair you buy with it, because coverage changes how many wefts you need. With a closure, a common guideline is two bundles for lengths up to about 14 inches, three bundles in the 16 to 22 inch range, and four at 24 inches and beyond. A frontal, covering more of the front, often needs one fewer bundle at short and mid lengths, holding at two bundles through roughly 18 inches before climbing. The reason longer hair still needs more is physical: wefts get shorter as the hair gets longer, so the same weft carries less hair and fullness has to come from extra bundles.
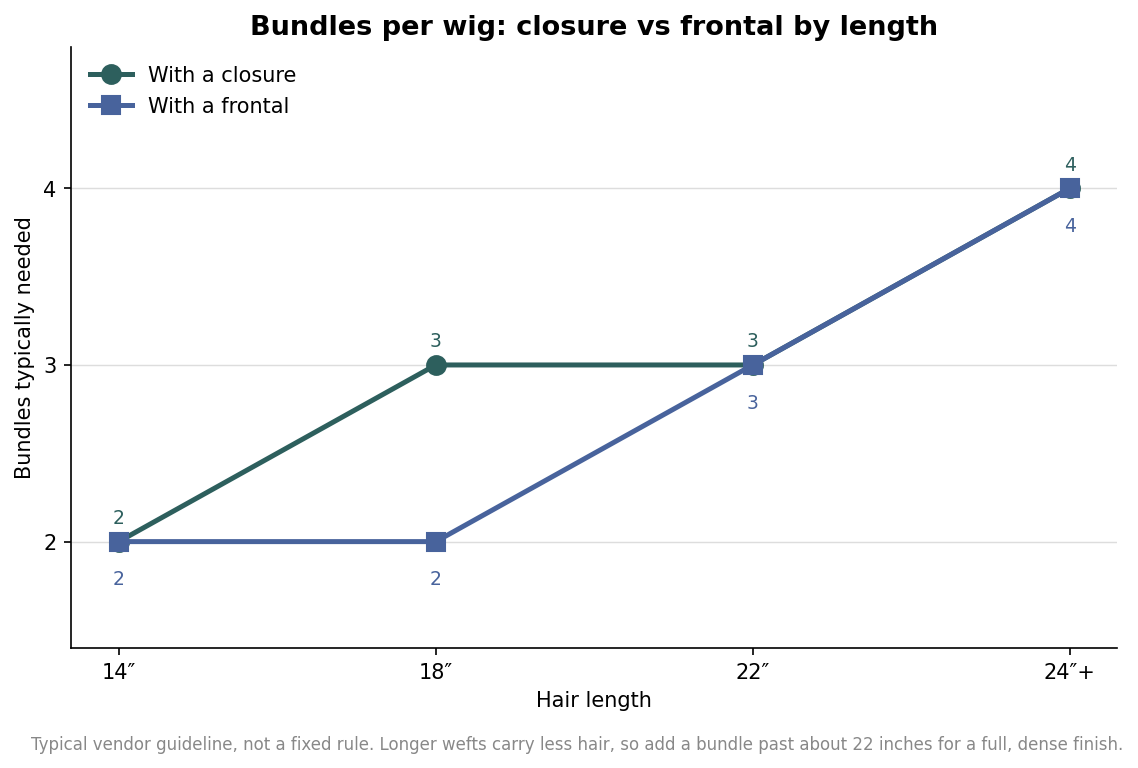
    Line chart of bundles needed by hair length for a closure versus a frontal
    A frontal usually needs one fewer bundle at short and mid lengths; both climb past 22 inches.

    Put together, the selection logic is straightforward. For an economical everyday unit with a consistent part, spec a closure and size it to how far off-center the wearer goes. For a natural ear-to-ear hairline, spec a 13×4 frontal, and upgrade to 13×6 only when deep parting and styling range justify the premium. For ponytails and updos, spec a 360. Then set the bundle count from the piece and the length, add a bundle past 22 inches for density, and the order sheet writes itself. Nail the front piece to the actual use case and everything downstream, cost, install time, and the wearer’s daily experience, falls into line.
  • Wig Lace, Decoded: HD vs Transparent vs Swiss (and When French or Korean Lace Is the Smarter Buy)

    Wig Lace, Decoded: HD vs Transparent vs Swiss (and When French or Korean Lace Is the Smarter Buy)

    On a well-made wig, the hair matters less than most buyers expect. What decides whether a unit vanishes at the hairline or announces itself from across the room is the lace: the sheer knotted mesh the front hairs are tied into. The trouble is that the three labels you see most often — HD, transparent, and Swiss — get thrown around loosely, and two suppliers can sell very different material under the same word. This is a plain-English guide to what actually differs, and how to choose when you are buying for real clients rather than a photo.

    What “lace” really means on a wig

    Lace is a fine, breathable net — usually a nylon or polyester mesh — and each front hair is individually hand-tied to it, knot by knot. When people argue about “lace types,” they are usually mixing up two separate questions. The first is how much lace a unit has: a lace-front closure covers only the front hairline, common footprints being 13×4 and 13×6 frontals or 4×4 and 5×5 closures, while 360 and full-lace units extend the knotted area around or across the whole cap for more parting freedom. The second question — the one this guide is about — is what the lace itself is made of and how fine it is. A 13×6 frontal made from coarse lace and one made from ultra-fine lace look nothing alike at the skin, even though the construction size is identical.

    HD, transparent, and Swiss: the honest differences

    HD lace (short for high-definition) is the thinnest, finest mesh a maker offers. Applied well, it presses almost invisibly into the skin and melts across a wide range of skin tones with little or no tinting. That fineness is also its weakness: it tears more easily, frays sooner at the hairline, and generally carries the highest price. The most important thing to understand is that “HD” is a marketing label, not a regulated standard with a fixed denier. One vendor’s HD can be noticeably heavier than another’s, so the name alone tells you little — you have to judge the actual material in hand.

    Transparent lace is a light, near-clear mesh that runs thicker and more forgiving than HD. It survives handling better and usually costs less, which makes it a sensible workhorse. The catch is color: because the mesh is pale rather than tone-matched, it can read slightly gray or ashy against deep skin unless it is tinted with a lace spray or a dusting of foundation before wear. Swiss lace sits in the middle in the best sense — fine enough to look natural, resilient enough to last, and, crucially, typically stocked in a few brown shades (light, medium, dark) so it can be matched to complexion out of the bag. For most sellers it is the safe default.

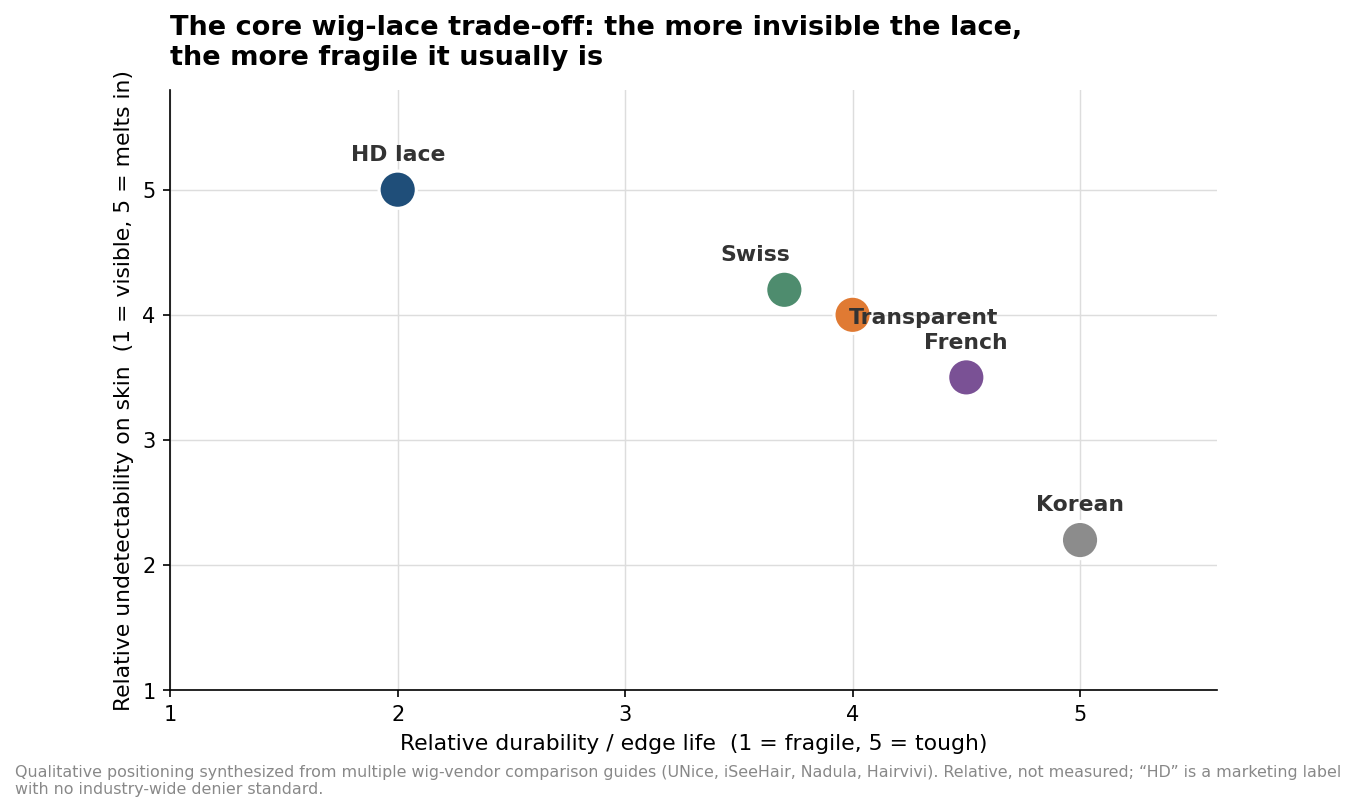
    Scatter chart positioning HD, transparent, Swiss, French, and Korean wig lace by relative durability and undetectability
    The core trade-off: the lace that hides best at the skin is usually the one that wears out first.

    The pattern in that chart is the whole story: undetectability and durability pull against each other. The lace that disappears best is usually the one that wears out first, and the toughest lace is usually the one you can see. There is no cheat around it — only a choice about which end of the trade-off a given client actually needs.

    French and Korean lace: the durable, budget end

    Two older materials round out the picture and often make more sense than the trendier options. French lace is a touch heavier than Swiss but still looks natural, and its extra toughness makes it a common choice for full-lace units that need to survive frequent restyling. Korean lace is the thickest and stiffest of the group. It is the most visible against skin and the least “melty,” but it is also the most durable and the least expensive, which makes it genuinely useful for practice units, mannequin display heads, theatrical and costume work, or clients who care more about a wig that holds up than about an invisible hairline.

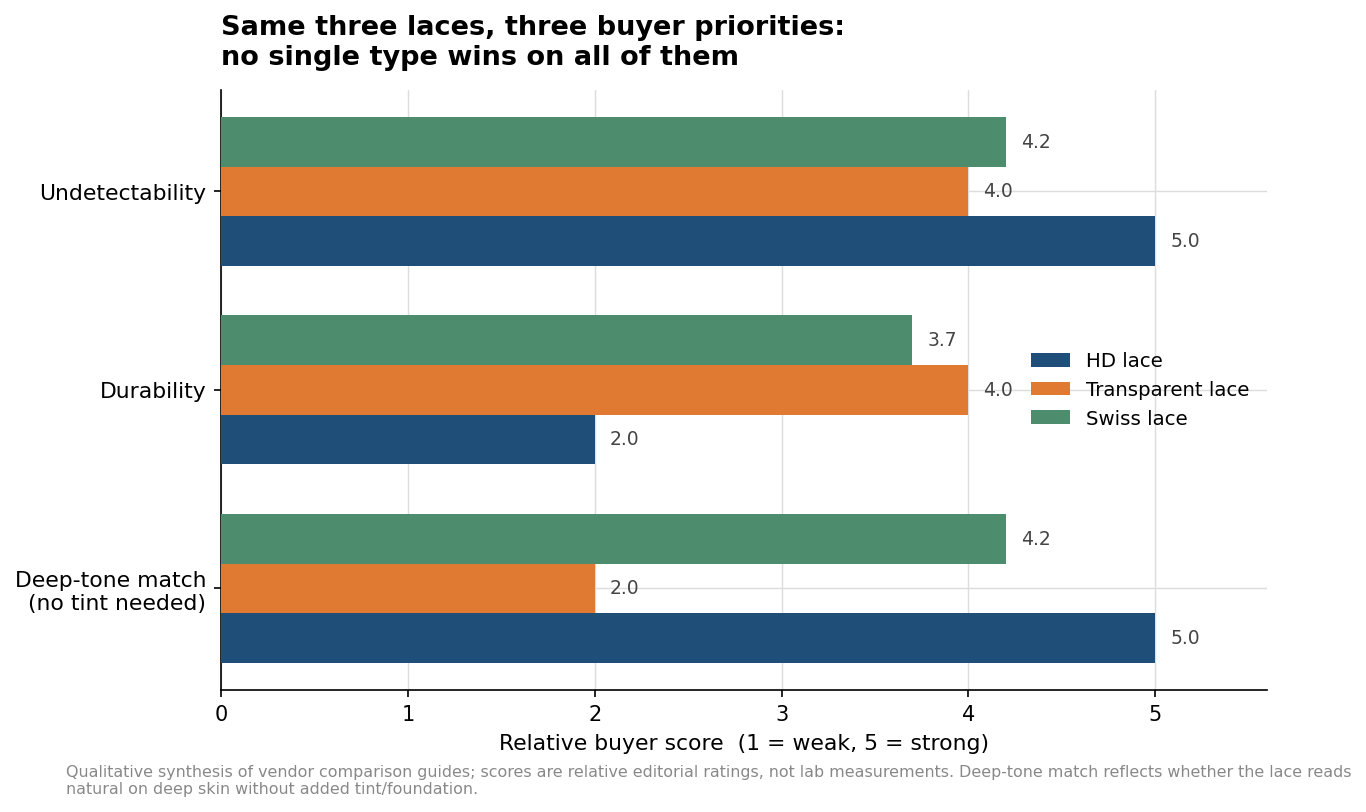
    Grouped bar chart scoring HD, transparent, and Swiss lace on undetectability, durability, and deep skin-tone match
    Scored on three buyer priorities, no single lace wins on all of them, so the right pick depends on the client.

    Notice the third bar in that comparison, deep-tone match, because it is the dimension buyers forget. Undetectability in a product photo usually means “photographed on light-to-medium skin.” On deep skin, a pale transparent lace can look grayish until it is tinted, HD tends to melt in across the range, and Swiss earns its keep precisely because it comes pre-matched in browns. If you serve a wide range of complexions, that single factor should weigh heavily in what you stock.

    Matching the lace to the client

    Work backward from how the wig will be used. For everyday wear, bridal, or anything photographed up close, the invisible hairline is worth the fragility, so a good HD or a well-matched Swiss is the right call. For deep skin tones, lead with Swiss in a dark shade or a transparent lace you are prepared to tint, and be honest with the customer that untinted transparent will need a step before it looks right. For resale or salon stock where a return erodes the whole margin, durability quietly matters more than the marketing, which pushes you toward transparent or Swiss over the most delicate HD. And for theatrical, costume, teaching, or display, Korean lace does the job at the lowest cost and takes abuse the finer laces cannot.

    What bulk buyers should actually check

    Because “HD” carries no industry standard, treat the label as a starting point and inspect the material yourself: hold it to the light, stretch a corner gently, and confirm that this batch matches the last one. Supplier consistency is the real variable, and it is worth more than any name on the packaging. Think in cost per wear rather than cost per unit — a fragile front that frays in a few months can cost more in replacements and returns than a slightly more visible lace that lasts a year with care. Plan a tinting step for deep-tone transparent units before they reach the customer, and pass on the same care basics you rely on: wash with a sulfate-free shampoo, air-dry, keep tension off the knots, and store on a mannequin, since the hairline is almost always the first thing to fail. With proper care, a quality human-hair unit commonly holds up for several months to a year or more, and the lace you chose at the outset is what decides which end of that range you land on.

    None of this makes one lace “best.” It makes the choice a deliberate one: decide whether this particular client is buying an invisible hairline, a hard-wearing unit, or a reliable match for their skin, and let that — not the flashiest label — pick the lace.

  • Wig Length Explained: How Inches, Texture, and Curl Change What You Actually Get

    Wig Length Explained: How Inches, Texture, and Curl Change What You Actually Get

    Length is the specification that buyers get wrong more than any other, and not because they cannot count. The problem is that the number printed on a wig is not the length you see in the mirror. A unit labeled twenty inches in a tight curl can sit several inches higher on the body than a twenty-inch straight unit, and a first-time buyer feels shortchanged when, in fact, nothing is wrong. Understanding how length is measured, where it lands, and why texture changes the answer is the difference between ordering the wig you pictured and ordering a disappointment.

    How wig length is actually measured

    Length is measured from the crown, near the top of the cap, straight down to the ends, with the hair pulled taut. That last detail is the crux of the confusion. For a straight wig, the measured length and the length you wear are effectively the same. For anything with wave or curl, the manufacturer straightens the hair to take the measurement, so the labeled number describes the hair stretched out, not the way it will actually hang once the curl springs back. The measurement is honest; it simply is not the same as the visible drop, and nobody tells the buyer that up front.

    Where each length lands

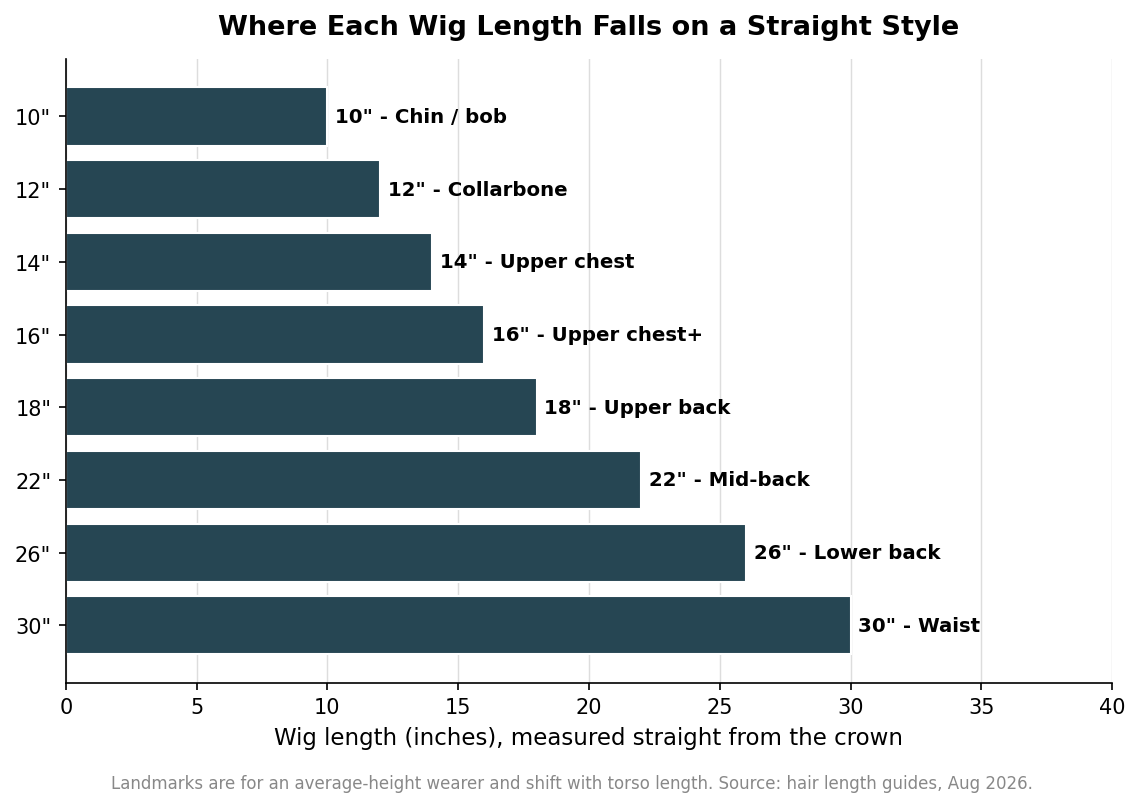
    On an average-height wearer with straight hair, the common lengths map to the body in a fairly consistent way. Around ten inches you get a chin-length bob. Twelve inches reaches the collarbone, fourteen to sixteen covers the upper chest, and eighteen inches, one of the most-ordered lengths, sits across the upper back. Twenty to twenty-two inches is the popular mid-back drop and is roughly the average length people picture as long hair. Twenty-four to twenty-six inches reaches the lower back, and twenty-eight to thirty inches falls to the waist. These are landmarks, not guarantees: a taller wearer or a longer torso shifts every one of them upward, so treat the chart as a starting reference and adjust for the actual person.

    Horizontal bar chart mapping wig length in inches to where straight hair falls on the body, from bob to waist
    Common lengths mapped to body landmarks for an average-height wearer on straight hair.

    Why texture makes hair "shrink"

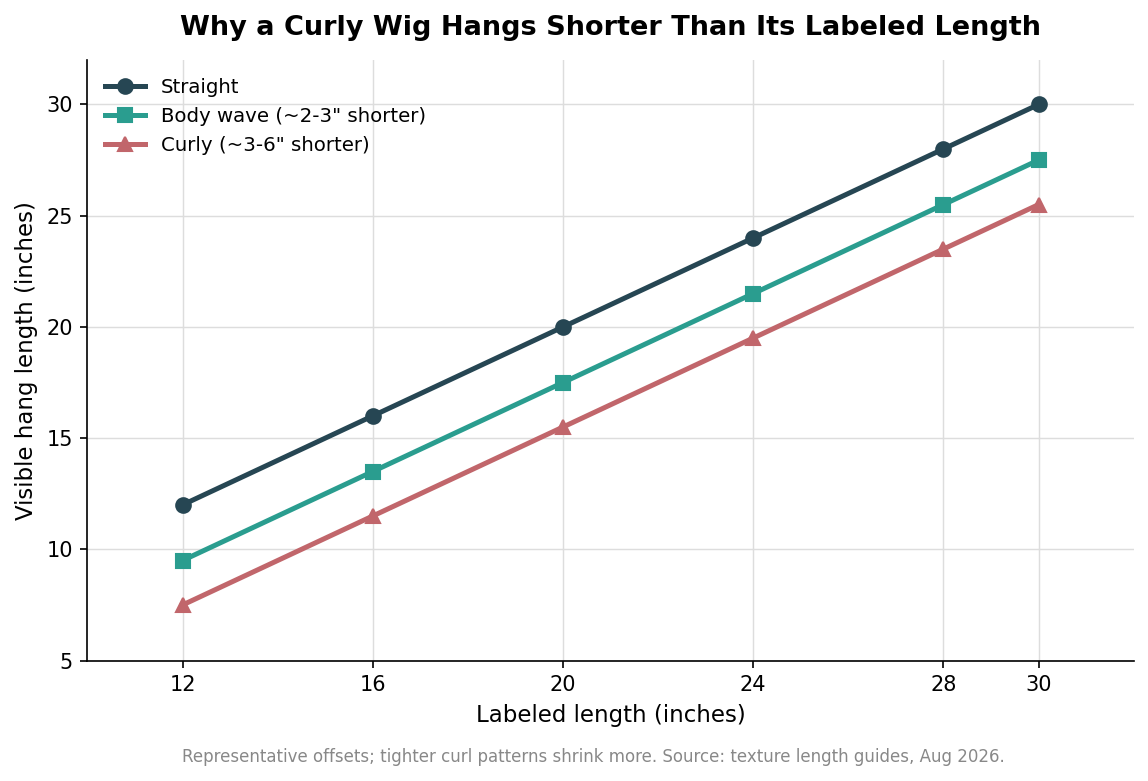
    Here is the part that generates the most returns. Because curl and wave coil the hair, a textured wig hangs noticeably shorter than a straight one of the identical labeled length. As a working rule, body wave falls roughly two to three inches shorter than straight, and curly falls roughly three to six inches shorter, with the tightest curl patterns losing the most. A twenty-inch straight unit lands at mid-back, but a twenty-inch tight-curl unit can read closer to the upper chest. This is not shrinkage in the fabric sense and it is not a defect; it is geometry. The practical response is simple: if you are buying a curly or wavy texture, size up. Order two to four inches longer than the straight length you actually want to see, and match the amount to how tight the curl is.

    Line chart comparing visible hang length against labeled length for straight, body wave, and curly textures
    Curly and wavy textures hang several inches shorter than straight hair of the same labeled length.

    Length, density, and price move together

    Length does not travel alone on a spec sheet. Longer hair needs enough density to carry it, because a long wig built at a light density thins visibly toward the ends and reads as stringy; as you add length you generally need to hold or raise density to keep the shape full. That combination has direct consequences for cost and weight. More inches and more density mean more hair, which raises the price and makes the finished unit heavier on the head, something worth weighing for pieces meant to be worn all day. For a bulk or reseller order, the useful move is to standardize on a small number of hero lengths rather than offering every inch. A tight range keeps your grading consistent, simplifies restocking, and covers the vast majority of demand, which clusters in the eighteen-to-twenty-two-inch band.

    Specifying length without a surprise

    Three habits prevent the length mistakes that lead to returns. First, specify texture and length together, and state where you want the hair to fall on the body, not just the inch count, so the maker can account for curl shrink on your behalf. Second, confirm the measurement method, that the length is taken from the crown with the hair pulled straight, so you and the supplier are describing the same thing. Third, on a first order with a new maker, ask for a length reference, a photo on a known-height model or a physical strand, before committing to a full run. None of this is difficult, and all of it is cheaper than a batch of wigs that measured exactly to spec and still landed inches from what the customer expected. Length is a number that only means something once you know how it was taken and what the texture will do to it.

  • The Complete Buyer’s Guide to Custom Wigs

    Wigs are bought on a photograph and a colour code. Four other things decide the result, and none of them is usually asked about.

    Take three measurements

    Circumference, front hairline to nape, ear to ear over the top.

    Straps adjust a cap that is close. They cannot fix one that is the wrong shape.

    Choose the cap for how it is worn

    Wefted for durability and cost. Monofilament crown for a real parting and a cooler cap.

    Lace front to wear hair back. Full lace to part it anywhere.

    Choose the fibre for heat, not for status

    Human hair takes heat and colour, and needs restyling after every wash.

    Heat-friendly synthetic keeps its style through washing and has a hard heat ceiling.

    Ask for density as a number

    A percentage, not an adjective. Lower at the front, graduated back.

    This is the single decision that most changes whether a wig reads as hair.

    And ask what remy actually means here

    Cuticles aligned in one direction. If nobody can evidence it, treat it as decoration.

  • Human Hair or Synthetic: The Honest Comparison

    This is usually framed as good versus cheap. It is really a question about heat, colour and how much styling a wearer wants to do.

    What human hair gives you

    Heat styling, cutting and blending, and darkening with a colour service.

    Long life when it is cared for, and the closest movement to growing hair.

    What it asks in return

    Restyling after every wash. Hair has no style memory, and neither does this.

    What synthetic gives you

    Style memory: it comes out of the wash in the style it went in.

    Heat-friendly fibre reshapes below a stated temperature.

    What it cannot do

    It cannot be lifted lighter, and it will not take a colour service.

    Above its heat ceiling it is destroyed, not damaged.

    Choose by the wearer

    Somebody who styles daily wants hair. Somebody who wants to wash and go wants fibre.

  • Why a Wig Looks Like a Wig From Across the Room

    At ten feet you cannot assess a cuticle, a fibre or a knot. You can only see shape and mass, which is exactly what gives a wig away.

    Real hairlines are sparse

    Hair does not start abruptly at full density along a clean line.

    It thins, scatters and grows irregularly for a centimetre or more.

    So density at the front is the tell

    A blunt dense front reads as a helmet at a distance, whatever the fibre.

    Graduated density with a plucked front reads as hair before anything else does.

    Knots are the close-up version

    Each tied strand starts at a knot, which reads as a tiny dark dot on lace.

    Bleaching the knots removes the dot where the lace allows it.

    What to specify

    A density percentage, graduated at the front, plucked hairline, knots treated.

    Then judge the sample from across the room, not in your hand.

  • How to Specify a Custom Wig: Cap Size, Construction, Density, and Hair Type

    How to Specify a Custom Wig: Cap Size, Construction, Density, and Hair Type

    A custom wig is a set of specifications before it is a product. Two wigs described as “long wavy human hair” can fit, part, and age completely differently depending on cap size, construction, and density. If you are ordering a custom or made-to-measure wig, the quality of what you receive tracks closely with the quality of the brief you give. Here is how to specify each decision in the order that matters.

    Start with measurements, not style

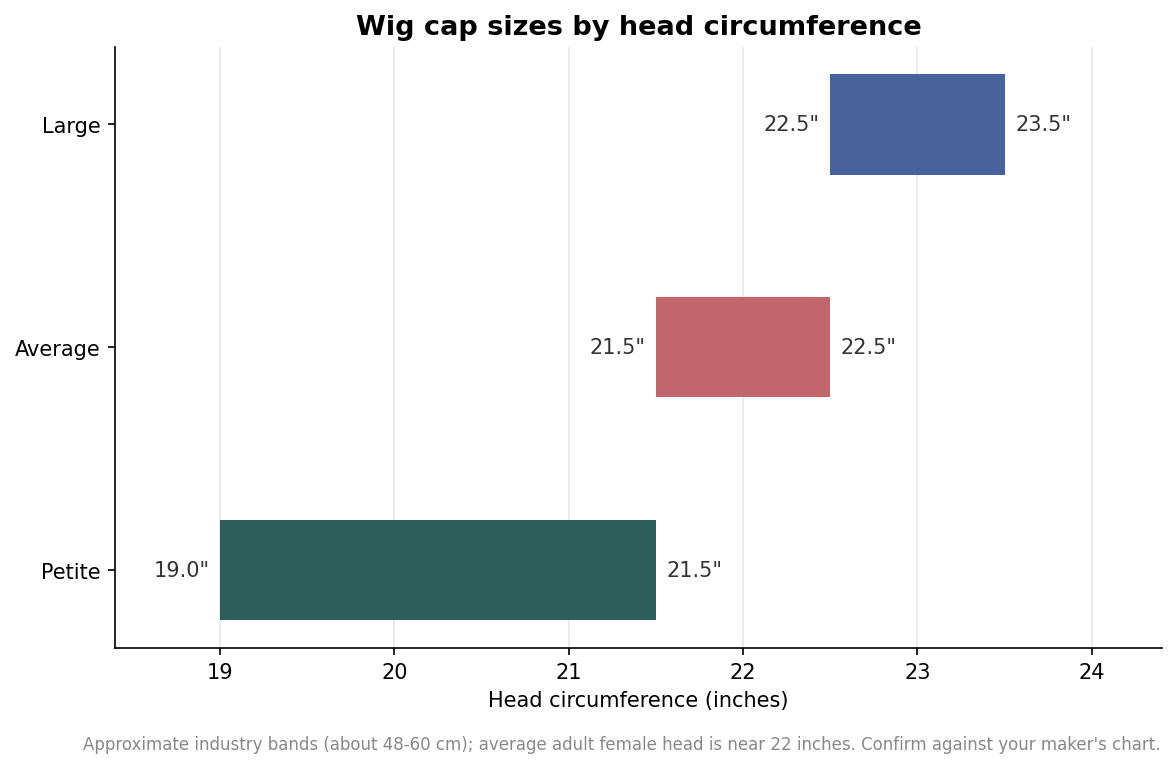
    Fit is the specification that a beautiful wig cannot recover from, so take it first. The single most important number is head circumference, measured with a soft tape around the hairline, above the ears, and around the nape. Most adult heads fall into three bands: petite at roughly 19 to 21.5 inches, average at about 21.5 to 22.5 inches, and large at 22.5 inches and up. An average adult female head sits near 22 inches, which is why most stock wigs are cut to that size.

    For a genuinely custom cap, one measurement is not enough. Makers typically ask for seven: full circumference, front hairline to nape, ear to ear across the top, temple to temple around the back, the nape width, ear to ear across the forehead, and the temple-to-temple hairline. Recording all seven lets the maker build a cap that follows your head rather than approximating it, and it is the difference between a wig that sits flat and one that lifts at the nape or slides forward. Take each measurement twice and write down both.

    Horizontal range bar chart of wig cap sizes petite, average and large by head circumference in inches
    Approximate head-circumference bands for petite, average, and large wig caps.

    Choose the cap construction

    The cap is the foundation, and it sets realism, comfort, styling freedom, and price all at once. Machine-wefted caps stitch rows of hair wefts onto an elastic base. They are the most affordable and the most durable, they breathe well, and they hide their construction under the hair, but they offer the least scalp realism and no natural part. Lace front caps hand-tie hair to a fine mesh strip, usually one-eighth of an inch to about an inch and a half deep, along the front hairline, so the hair appears to grow from the skin and can be styled off the face. Monofilament tops hand-tie hair to a sheer mesh crown, creating a natural-looking part that can move in any direction and sitting gently against sensitive scalps.

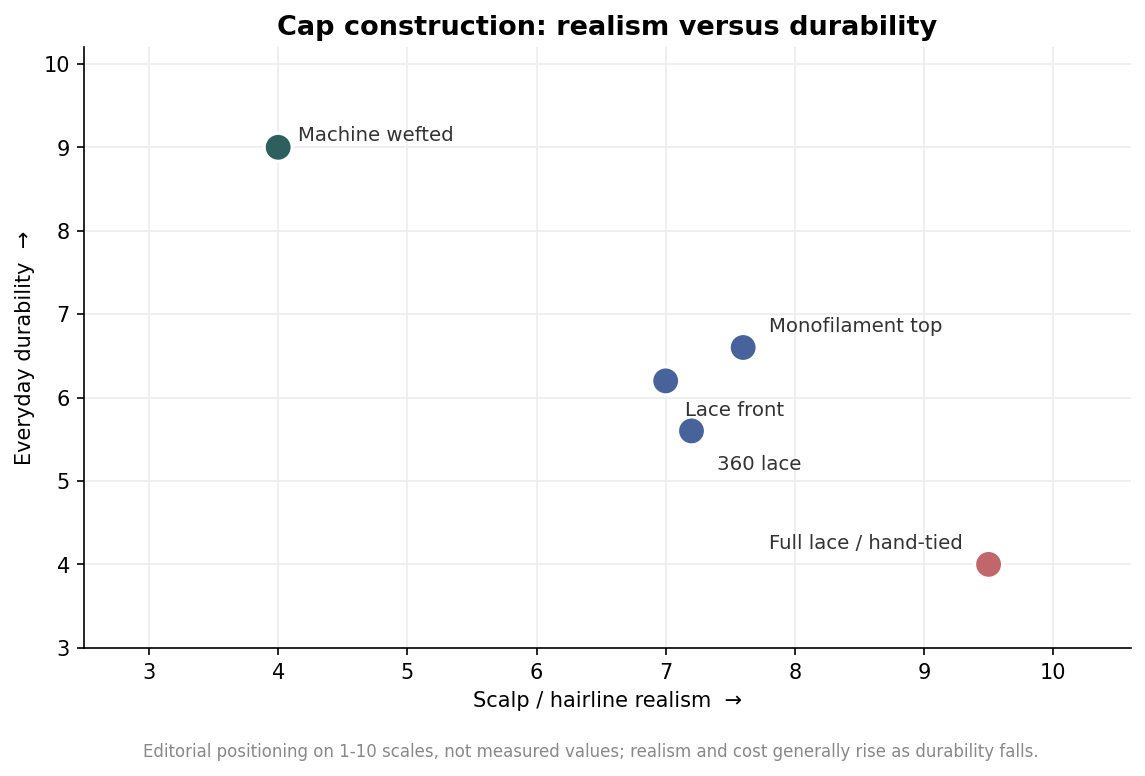
    Beyond those, a 360 lace cap runs lace around the entire perimeter with wefts through the center, which supports high ponytails and updos, while a full lace or fully hand-tied cap ties every hair individually across the whole cap. Full lace is the most natural and the most versatile to style, and it is also the most expensive and the least hardy; a single hand-tied wig can take around three days to make. As the positioning map below shows, realism and durability generally pull in opposite directions, so the honest question is how much daily robustness you are willing to trade for an invisible hairline and free parting.

    Scatter chart positioning wig cap constructions by scalp realism versus everyday durability
    An editorial map of cap constructions: realism and durability tend to trade off.

    Set the density

    Density describes how much hair is attached to the cap relative to a full natural head, and it is one of the most common sources of disappointment when left unspecified. Around 130 percent reads as natural and everyday, close to average growing hair. Roughly 150 percent is the most requested level, giving a fuller look that still passes as real. At 180 percent and above the hair is deliberately glamorous and thick, the density you see on stage and in editorial shoots but that can look obviously wig-like in daily settings. Density can also be graded so the hairline is lighter than the crown, which is worth requesting because uniform density at the very front is a giveaway. Tell your maker both the percentage and where you want it distributed.

    Pick the hair and the lace

    Human hair versus synthetic is the choice that drives cost and behavior. Human hair, and especially Remy hair with its cuticles aligned in one direction, can be heat-styled, colored within reason, and lasts longest, but it costs more and needs styling like your own hair. Synthetic fiber holds a pre-set style through washing and weather and costs far less, but standard synthetic cannot take high heat; if you want to use hot tools, specify heat-friendly synthetic and confirm its temperature ceiling. There is also a middle path in blended fibers, which trade some of each side’s strengths.

    The lace itself is a smaller decision with a visible payoff. Swiss lace is thinner and disappears more easily against skin but tears more readily; French lace is sturdier and slightly more visible. So-called HD or transparent lace melts into a wider range of skin tones and is worth requesting if the hairline will be on display. State your skin tone or send a photo so the maker can match or tint the lace rather than shipping a default shade.

    Write it all down before you order

    By the time you place a custom order, your brief should name six things: the seven cap measurements, the cap construction, the density percentage and its distribution, the hair type, the lace type and shade, and the finished length and texture. Lengths are measured straight from the crown, so remember that a curly or wavy texture will hang several inches shorter than the same length cut straight. Custom and hand-tied wigs also take time to build and are hard to alter once made, so confirm the specification in writing and, where possible, approve a sample of the hair and lace first. The measurements and figures here are typical starting points rather than universal standards, and any reputable maker will have their own charts; the goal is simply to arrive with decisions made rather than leaving them to be guessed.